
Why you need a Sled:
Sled dragging is a very effective option for all levels of athletes challenging your level of conditioning with minimal wear and tear on the body. (It is very easy on the knees, hips, and ankles, making it great tool for older strength athletes!) For younger athletes, it’s a great way to build the lungs and legs/hips with minimal coaching. Plus it does not require the high learning curve of a squat or the deadlift. Sled workouts are quick and efficient. In less than 20 minutes, an athlete can push their way to burning lungs and legs. In my opinion, it’s the bestoption for those without a bike, rower, or treadmill in their home gym arsenal.
Quick Snapshot
Build It – For as little as $15, you could have the most badass piece of conditioning at your disposal
Buy It – Rogue Fitness and EliteFTS make steel sleds for $125 + shipping but you run the risk of upsetting your neighbors with the noise of steel on pavement
MATERIALS, TOOLS & BUDGET
- Used Tire = free from the local tire shop
- 3” Eye bolt, washer, and lock nut = $5
- 12’ light chain (or other straps), carabineers, handles, or an old Back Pack = $10-$30
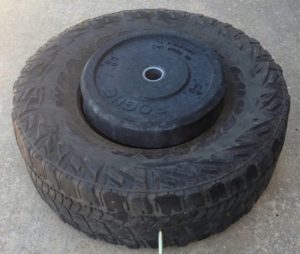
***If you are lucky, a 45 lbs plate MAY fit on top of the DIY Tire Sled where the old rim was.
Optional for those who want to build a plywood top to secure weights:
If you’re not lucky, plan on loading 25 lbs plates, or want a more secure surface for your weights, you will need to build a base with a loading pin.
- ¾” plywood
- Screws
- 1 1/2 in. Galvanized Malleable Iron Floor Flange = $17
- 1 1/2 in. x 8 in. Galvanized Steel Nipple = $9
- HEX Lag bolts = $1
NOTE: Diameter of the steel MUST be based on the diameter of your plates
- Power Drill
- Drill Bit
- Adjustable Wrench
- Circular Saw or Jig Saw (for optional plywood top)
Total Budget DIY Tire Sled
approximately $15 – $60 based on your needs
Assembly
- Drill a hole in the DIY Tire Sled for the Eye bolt
- Insert the eyebolt, place the washer and lock nut on the inside of tire and tighten with Adjustable Wrench
- Clip on Large carabineer to Eye bolt
- Attach the chain or strap to the Large carabineer
- You will need 2 lengths of chain or straps if you plan on using handles for additional upper body work
- You will only need 1 length of chain or strap if you plan on using your old back pack for walking with the sled
- Clip another Large carabineers to other end of the chain or straps
- Attach your old back pack or handles
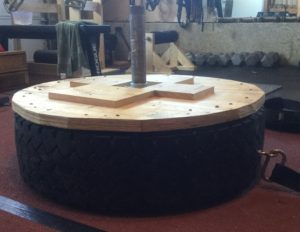
Optional Assembly for the Plywood Top
- Place your tire on top of the plywood
- Trace the plywood
- Using your Circular Saw or Jig Saw, cut the plywood into a circle
- Drill the plywood circle to the top of the tire
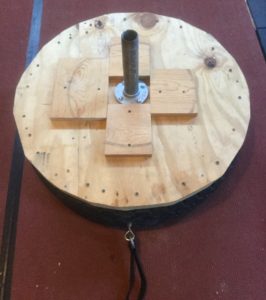
- Center the flange on the plywood circle and attach with 4 lag screws
- Cut scrap plywood into squares
- Screw them to the plywood surrounding the flange
- This will act as a stabilizer so your plates are rattling during your workout
- Hand screw the nipple into the flange
DONE!